You can keep up to 10 CVs here -- delete one you don't need.
AutoCAD 2D
AutoCAD for Beginners: Your First Day — the Screen, 16 Commands and Your First Drawing
Head office: CADD Training Centre2026-10-30👁 24
New to AutoCAD? Learn the parts of the screen, how the command line works, the three ways to give a point, the 16 commands you will use every day and how to draw and save your first 100 × 60 rectangle.
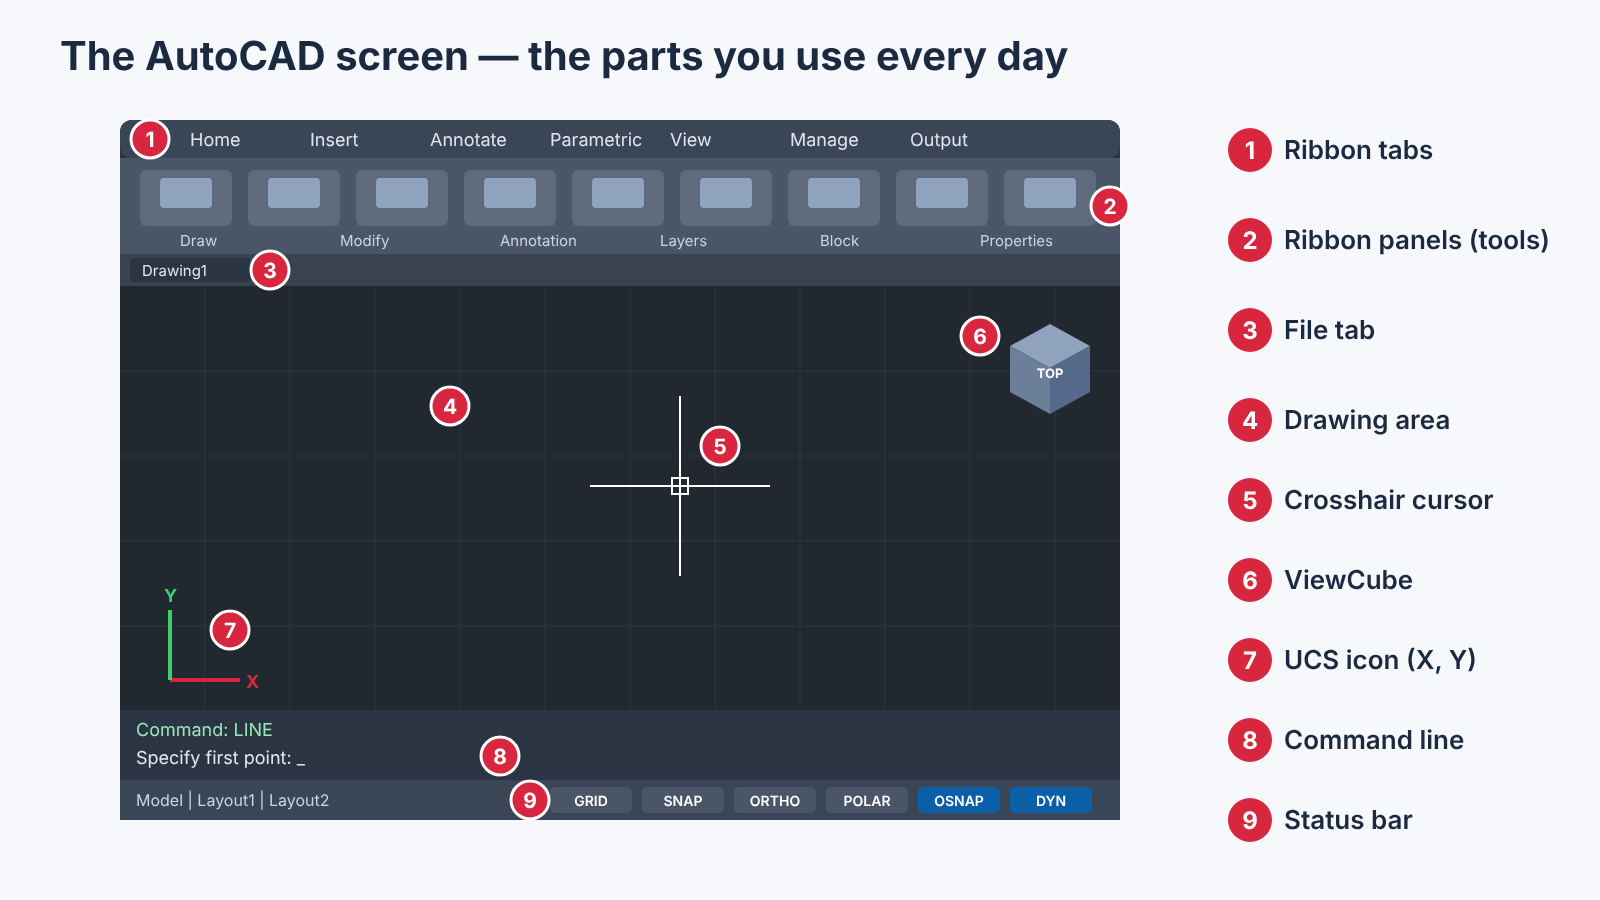
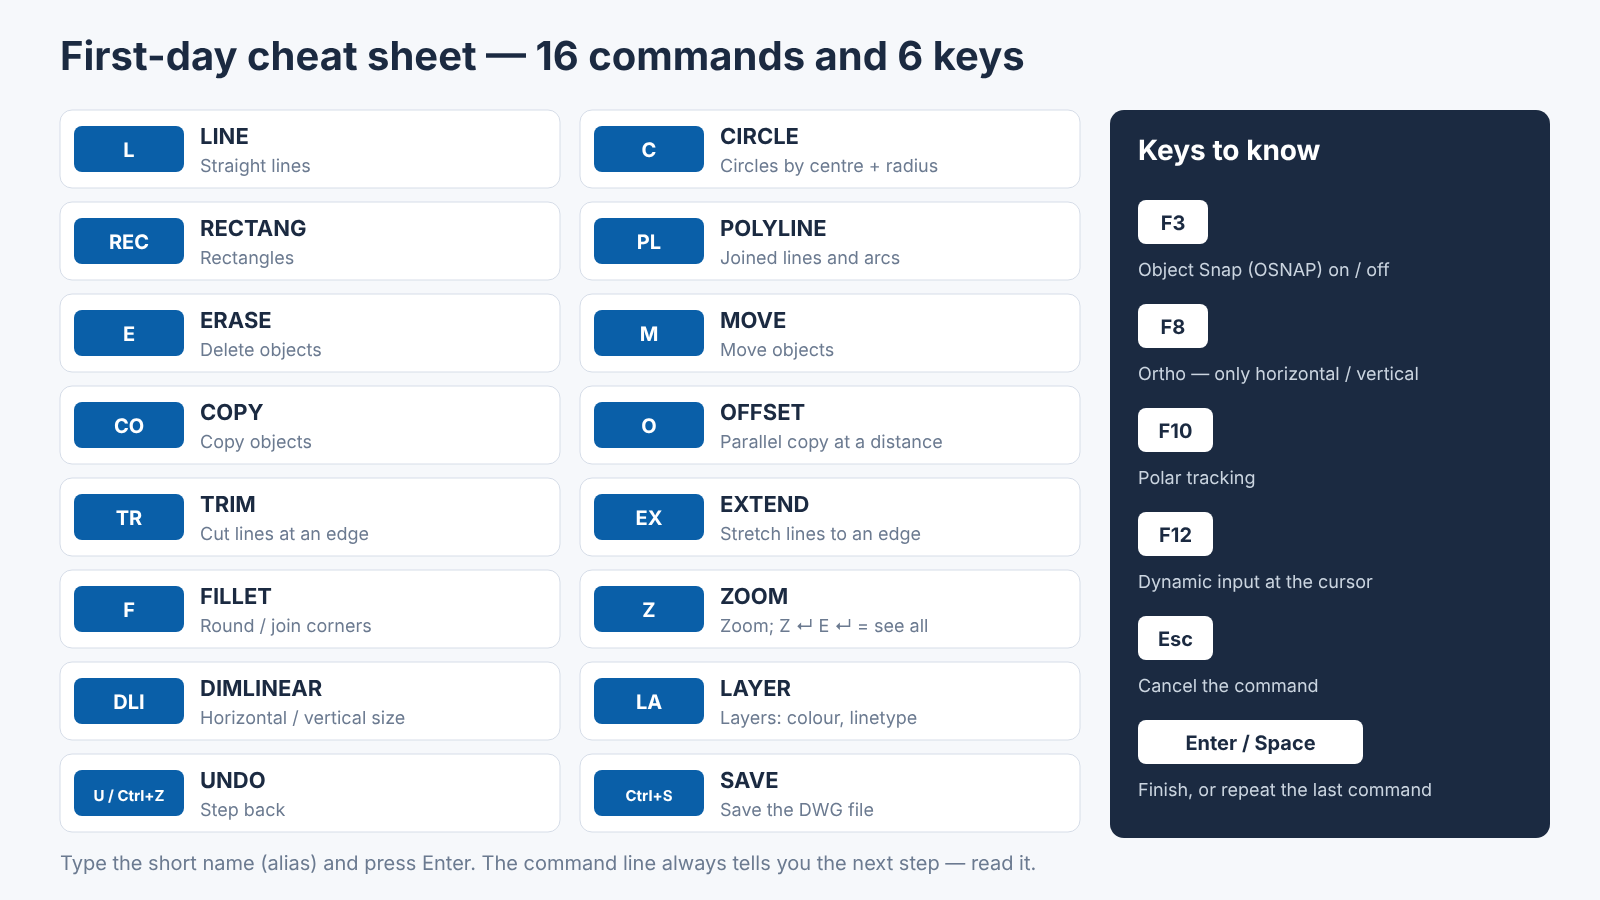
WHAT IS AUTOCAD?AutoCAD is computer-aided design (CAD) software from Autodesk. Civil, architecture, mechanical, electrical and interior professionals use it to make accurate 2D drawings (plans, sections, elevations, machine parts, layouts) and 3D models. A drawing is saved as a DWG file, the file format most design offices share.This tutorial is for your first day. You need no earlier CAD knowledge — only AutoCAD installed on your computer. The steps work in recent versions of AutoCAD; menu names can differ a little between versions.STEP 1 — START A NEW DRAWING1Open AutoCAD and click New (or press Ctrl+N).2Choose the template acadiso.dwt — it is metric, so 1 drawing unit can be 1 millimetre.3Type UNITS and press Enter. Check that Length type is Decimal and Insertion scale is Millimeters. Click OK.STEP 2 — KNOW THE SCREEN1Ribbon tabs — Home, Insert, Annotate, View … each tab opens a set of tools.2Ribbon panels — Draw, Modify, Annotation, Layers: the buttons for the commands.3File tab — every open drawing has its own tab, like a web browser.4Drawing area — the big dark area. It is unlimited in size: you always draw at real size (full scale).5Crosshair cursor — where you pick points.6ViewCube — turns the view in 3D; for 2D work keep it on TOP.7UCS icon — shows the X (right) and Y (up) directions.8Command line — the most important part. It shows what AutoCAD wants from you next. Read it at every step.9Status bar — switches for drawing aids like Ortho, Polar and Object Snap.STEP 3 — HOW A COMMAND WORKSEvery command can be started in three ways: click its button on the ribbon, type its full name, or type its short name (alias) and press Enter. Example: type L and press Enter to start LINE.• Enter or Space — confirms a value and finishes a command. Pressing Enter on an empty command line repeats the last command.• Esc — cancels the command at any time.• Ctrl+Z (or U) — undoes the last step.STEP 4 — THE THREE WAYS TO GIVE A POINTAutoCAD measures everything from the origin 0,0 with X to the right and Y up.• Absolute X,Y — the exact position from 0,0. Example: 110,10.• Relative @X,Y — the distance from the last point. Example: @100,0 means 100 to the right, 0 up.• Polar @length<angle — a distance and an angle from the last point. Angles are counted anticlockwise from the right (0° = right, 90° = up, 180° = left, 270° = down). Example: @60<90 means 60 straight up.Note: when Dynamic Input (F12) is on, the second and later points you type are taken as relative even without @. To type an absolute point then, start it with # (for example #110,10). If you are unsure, switch Dynamic Input off with F12 while you practise.STEP 5 — YOUR FIRST DRAWING: A 100 × 60 RECTANGLEMethod A — with LINE and relative points:1Type L and press Enter.2First point: type 10,10 and press Enter.3Type @100,0 and press Enter (bottom edge, 100 long).4Type @0,60 and press Enter (right edge, 60 high).5Type @-100,0 and press Enter (top edge, back to the left).6Type C and press Enter — C closes the shape back to the first point.Method B — with polar points: L, Enter, 10,10, Enter, then @100<0, @60<90, @100<180, Enter after each, and C to close.Method C — with RECTANG (one object instead of four lines): type REC, Enter, pick or type the first corner 10,10, then type @100,60 and press Enter.Now type Z, Enter, E, Enter (Zoom Extents) to fit the drawing on the screen.STEP 6 — DRAWING AIDS ON THE STATUS BAR• F8 Ortho — the cursor only moves horizontally or vertically. With Ortho on you can point the direction with the mouse and just type the length (for example 100, Enter).• F10 Polar tracking — shows guide lines at set angles (90°, 45°, 30° …).• F3 Object Snap — locks the cursor exactly onto points of objects: Endpoint, Midpoint, Center, Intersection, Perpendicular. Right-click the Object Snap button to choose which snaps are on. Never guess a point by eye — snap to it.• F12 Dynamic Input — shows the prompt and the values next to the cursor.STEP 7 — THE FIRST 16 COMMANDSDraw: LINE (L), CIRCLE (C), RECTANG (REC), PLINE (PL).Modify: ERASE (E), MOVE (M), COPY (CO), OFFSET (O), TRIM (TR), EXTEND (EX), FILLET (F).View and organise: ZOOM (Z), LAYER (LA), DIMLINEAR (DLI).Also: UNDO (U or Ctrl+Z) and SAVE (Ctrl+S).Zoom with the mouse wheel; hold the wheel down and drag to pan.STEP 8 — PRACTICE: A ROOM PLAN WITH WALLS1Draw a rectangle of 4000 × 3000 with REC (first corner 0,0, then @4000,3000). In millimetres this is a 4 m × 3 m room.2Type O (OFFSET), Enter, distance 230, Enter. Click the rectangle, then click outside it. You now have a 230 mm wall.3Type C (CIRCLE) and press Enter. Type 2000,1500 for the centre and 300 for the radius — a round table in the middle of the room.4Type DLI and pick two corners of the outer rectangle to add a dimension.5Type Z, Enter, E, Enter to see everything.STEP 9 — SAVE YOUR WORKPress Ctrl+S, choose a folder, give a clear file name (for example Room-Plan-01) and keep the type AutoCAD Drawing (*.dwg). Save every few minutes.COMMON MISTAKES ON DAY ONE• Not reading the command line — it always tells you the next input.• Typing an absolute point while Dynamic Input is on (see Step 4).• Picking points by eye instead of using Object Snap.• Drawing at a scale. In AutoCAD you always draw at full size; scale is set only when you print or in a layout.• Forgetting Esc — if something strange happens, press Esc twice and start again.WHAT TO LEARN NEXTLayers and line types, polylines, hatching, text and dimension styles, blocks, and printing to PDF from a layout. These are covered step by step in the AutoCAD courses at CADD Training Centre, where every student practises on a computer with real drawings. Have a question about this tutorial? Ask it in the comment box below.
क्या यह tutorial काम का लगा? Like it, and share it with a friend who is learning AutoCAD 2D.